This is default featured slide 1 title

Go to Blogger edit html and find these sentences.Now replace these sentences with your own descriptions.This theme is Bloggerized by Lasantha Bandara - Premiumbloggertemplates.com.

This is default featured slide 2 title

Go to Blogger edit html and find these sentences.Now replace these sentences with your own descriptions.This theme is Bloggerized by Lasantha Bandara - Premiumbloggertemplates.com.

This is default featured slide 3 title

Go to Blogger edit html and find these sentences.Now replace these sentences with your own descriptions.This theme is Bloggerized by Lasantha Bandara - Premiumbloggertemplates.com.

This is default featured slide 4 title

Go to Blogger edit html and find these sentences.Now replace these sentences with your own descriptions.This theme is Bloggerized by Lasantha Bandara - Premiumbloggertemplates.com.

This is default featured slide 5 title

Go to Blogger edit html and find these sentences.Now replace these sentences with your own descriptions.This theme is Bloggerized by Lasantha Bandara - Premiumbloggertemplates.com.

Selasa, 26 Januari 2016

More Information Call


PT TESTINDO

JL. Radin Inten II no. 61 B Duren Sawit, Jakarta 13440
Mobile / WHATSAPP:  0813 9929 1909
PIN BB:  580EC93D
Phone. 021-29563045
Fax. 021-29563052
Email: sales@testindo.com
Website: www.testindo.com

Minggu, 17 Januari 2016

Inspecting Welded Tube

Inspecting Welded Tube

  • 85 plus years of experience
  • Superior test systems
  • Knowledgeable fieldstaff
  • In or off-line NDT equipment
  • Eddy current
  • Ultrasonic
  • Flux leakage
  • Custom systems
  • Material Handling


 Factors Influencing Test Methods


weld-line crackSome weldline cracks, such as this one shown above, may be detected by both eddy current and ultrasonic equipment.
NDT System in IndiaFactors that influence system selection include the capabilities and limitations of each technology, as well as the diameter, wall thickness, tube condition, and throughput speed of the product under test. Where the test is applied in the manufacturing cycle also influences the choice of method and apparatus. This can range from tests limited to the heat affected zone on the weld mill with perhaps an in-line anneal, to full body inspection of cut lengths after drawing and annealing or other heat treating. Each test method has inherent capabilities and limitations that are different.


pinhole flaw Common Defects Detected

  Generally, for tube applications that require high throughput speeds, eddy current is the preferred method to detect small, short, incomplete welds,and some subsurface cracks in carbon steel or non ferrous tube. For full body tests, including the detection of long, continuous defects such as incomplete seam welds in tube, and inclusions, voids or cavities, ultrasonic test systems are recommended. Flux leakage systems are available to accurately detect longitudinal and transverse surface defects on the OD and ID of heavy-wall magnetic tubing.


The picture above shows a short pinhole flaw that was detected by eddy current, but was difficult to detect using ultrasonic tests.


long weld defect for UT Weld Types

  The process of ERW and Induction welding is preferred for most carbon and alloy steel. Defects that may arise include all of those previously mentioned. TIG welding is a slow process usually used for stainless steel or titanium. Incomplete ID weld defects are a common concern in this process. Laser welding is a much faster process used for stainless steel, titanium, duplex and nickel alloys. Typical defects include very short pinholes, and long continuous ID defects such as incomplete or miss-match welds.

This picture above shows a cross section of a tube wall with a long, continuous poor ID weld that was detected by ultrasonic methods, but not by eddy current.


      DOWNLOAD PDF

Inspecting Tube Ends

Inspecting Tube Ends


The MAC Solution
    24
  • Fulfills API 5CT & 5L
  • Detects ID & OD longitudinal and transverse notches down to 5% of the tube wall
  • Detects lamination 6.2mm FBH
  • Measures wall thickness
  • Innovative Automated
    Pitch Control
  • Unique end plug cone follows unstraight tube ends
All NDT test methods have some limitation in regard to testing to the very end of a tube. These “untested
ends” must be cut off, resulting in a substantial loss of product and revenue, or the manufacturer needs to
develop a method to test these ends to meet the tube integrity requirement. Some industries require that the
end be tested to a higher level of integrity because it is being expanded, threaded, or welded in the field,
and end integrity is critical to the tube performance. MAC’s new UT End Tester provides a solution to this
problem.


25
MAC’s Echomac FD-5 electronics provide the
critical software for controlling the transducers
and receiving, adjusting, analyzing, and
reporting the test results.
26The Echomac® UT End Tester consists of two
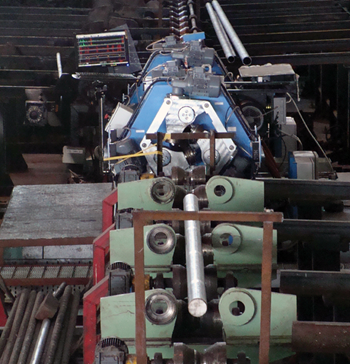
independent, identical test stations designed to
inspect the untested portion of a tube end.
Generally this portion would range between 250
and 500mm from the tube end, depending on the
application.


DOWNLOAD Pdf

Inspecting Oil Country Tubular Goods

Inspecting Oil Country Tubular Goods

NDT in Oil and Gas Industry

Types of Oil & Gas Products include:

  • Line Pipe- (Larger diameter, relatively thin wall)
  • Drill Pipe- (Typically heavy wall seamless tubes)
  • Casing – (Mainly seamless but may be welded)
  • Sucker Rods- (In Cut lengths)
  • Umbilical Coils- (Small diameter, long length)
  • Other types of tubes- (Including coupling stock)
Note: Line pipe, drill pipe, casing, and other types of oil and gas tubes are best inspected using flux leakage & ultrasonic multi test systems. Whereas, sucker rods and umbilicals are best inspected using eddy current & ultrasonic multi test systems.

Common Applications Include:

  • Sour Gas
  • High Pressure
  • Offshore Wells
  • Arctic Wells
  • API grades for other wells

Methods of Production Include:

  • Welded- (Scarfed & Annealed for flux leakage)
  • Seamless

Inspecting Oil Country Tubular Goods (OCTG) 

With over 85 years of experience, MAC has a wide variety of custom designed systems for the inspection of oil country tubular goods (OCTG) and other oil and gas products that not only meet individual client specifications, but that of API 5CT and 5L, ASTM, and ISO.
23MAC’s highly trained and knowledgeable engineers, field staff, and representatives provide superior NDT equipment, services, and training worldwide.
MAC’s Rotoflux® flux leakage and Echomac® ultrasonic inspection systems are the best suited for inspecting heavy wall pipe for wall thickness variations, laminations, longitudinal, transverse, ID/OD, and internal defects. These rotary systems are designed to inspect pipe up to 500mm in diameter.
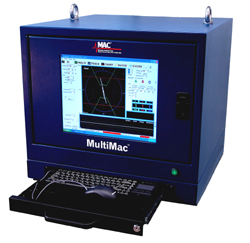
MAC eddy current systems such as the Multimac® and the Minimac® 40 are also available for thinner wall pipe.
mage above is an inline ultrasonic rotary test system designed to test carbon steel tubes for longitudinal and transverse defects as well as wall thickness and lamination. The system includes the seal-less designed ultrasonic rotary mechanics developed to minimize maintenance especially due to dirt accumulation from hot rolled product. Coupled with the rotary is the Echomac® electronics which provides all the channels necessary in one computer cha
ssis. The rotary head is mounted on a Triple Guide Roll Test Bench which is highly automated to provide fast changeover times and consistent product throughput, and is extremely durable; thus able to withstand the                                                                                                                        
heavy demands of OCTG plant conditions.
The combination of an ultrasonic and eddy current NDT system allows for the detection of incomplete and mismatch welds, pinholes, leakers, and weepers in small diameter, long length umbilical coils. For sucker rods, which are hot rolled, cut length carbon or alloy steel, complete automated systems including encircling and spinning probe eddy current for surface and near surface defects, and ultrasonic rotary for internal and subsurface defects are available.

DOWNLOAD pdf

Inspecting Finned Copper Tube

Inspecting Finned Copper Tube

Industries:
  • HVAC
  • Refrigeration/Appliance
  • Electronic Cooling
    13
    MultiMac with built-in Display
Equipment:
  • 2 Channel MultiMac®
  • MID- MagneticInclusion Detector
  • CP 10
  • “ZZ” Magnetic Dual Coil
  • 3500 Pinch Stand
Defects:
  • Surface, ID & OD
  • Splits
  • Broken Discs
  • Metal Incrustation
  • Inclusions
  • Tears
  • Pin Holes

Metallic inclusions in copper tubing may appear from two major sources.   The first one comes from the material itself which can contain residual impurities from continuous casting.  The second and major source of metallic inclusions in copper finned tubes occurs during the manufacturing process. They can appear in the tube when the tool used to make the fins is breaking.  Small particles of metal (tungsten) make inclusions on the OD or even through the wall.  This leads to potential leaks when heat exchanger tubes are mounted in the shell.  Metal inclusions such as filings from finning tools can be as small as 3 mg.
Therefore they are not commonly detected by using a simple eddy current coil.  In this instance a Magnetic Inclusion Detector (MID) must be introduced to the system for better results.
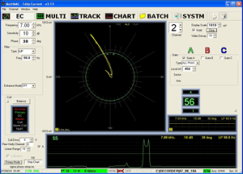
In order to detect such small inclusions, the MultiMac electronics uses a second channel connected to the second half of the coil sensor consisting of a single absolute winding located in the DC field and generated by the two permanent magnets.

Download PDF

Inspecting Billets

Detecting Sigma Phase

Detecting Sigma Phase

15.pngDownload PDF
·         2507 Duplex Stainless Steel Tube ·         80 FT Cut Lengths

·         3/4″ OD with .083″ Wall Thickness
·         Detects Sigma Phase as Small as 2.6% of Tube Wall Cross Section
·         2 Channel MultiMac® Eddy Current Tester- Offline
·         2 Varimac® Comparator Coils
Description: Sigma Phase is a brittle, nonmagnetic phase of tetragonal structure occurring in many transition metal alloys; frequently encountered in high chromium stainless steels. It results from a transformation of Delta ferrite in the alloy, creating carbides at the grain boundaries, which reduces the carbon and chromium content that normally provides strength and corrosion resistance in the metal matrix. Because the condition has significant length and is not a single point type defect, the standard, which is provided by the customer, is measured as a percent of the cross section of the tube wall or bar, using micrographic techniques. Some metallurgists believe that sigma phase commonly occurs at temperatures between 600°C and 900°C. Another cause of sigma phase is due to a malfunction of the high temperature furnace; causing the material to undergo an extended length of time in heat treatment.For the 2507 grade of duplex stainless steel, sigma phase may be resolved at temperatures above 1050°C through a corresponding annealing.

14


System: 

16The test consists of a 2 channel MultiMac® coil eddy current tester. 1 channel is used for the detection of typical defects, while the other channel is used for finding sigma phase; a condition caused from improper or extensive heat treatment.The second channel on the MultiMac is an absolute tester using two Varimac® coils. One coil is balanced on air and used to calibrate the equipment with a reference standard.
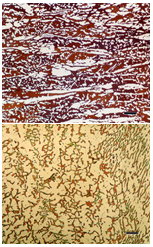
The other is the actual test coil installed on a CP 30 (Coil Platform). The system is mounted on a Dual Pinch Stand test bench and is comprised of a CP 352 for defect detection, followed by CP 30 for sigma phase. This system operates offline on cut length of 2507 duplex stainless steel tubes up to 80 feet in length, 3/4” OD, with a wall thickness of 0.083”.

1813

Coil Platform 352 on the left for defects followed by coil platform 30 towards the right for Sigm
a Phase.  Above is the MultiMac Electronics.